


A Tricky Woodwork Restoration
About the author
Oliver von Borstel, 44, is a Swiss living in Holland. He has collected for five years. Now the managing director of an American hydraulics company, Denison Hydraulics operating in the Benelux countries. His first career was as a cabinet maker with special training in antiques restoration.He later got degrees in business economics and marketing and has extensive experience in logistics, computer systems, production planning and people management.His collection is growing fast - 200 machines and counting. It includes toys, domestic and even industrial models. Oliver is a member of ISMACS and Der SchlingenfängerPlease contact him directly with any woodwork questions at [email protected] or write to Oliver von Borstel, Oever 6, NL-3121 XS, Schiedam, The Netherlands.Web site (under construction): http://home.planet.nl/~borstoli
IT IS MY experience that, usually, most collectors are capable of restoring sewing machines when it comes to fixing machine heads, metal parts or mechanical defects. But when it comes to restoring woodwork, only a few can tackle it because it is sometimes very difficult and needs expertise, which is normally the field of the professional.
An expert at restoring antique furniture has, of course, no problem with restoring any woodwork. Therefore, it is my pleasure to describe to my ISMACS colleagues, the restoration of a badly-damaged Peugeot 2 Balancieres. I feel sure that the 'handymen' among us might learn something useful.
Damage report on the Peugeot Balancieres
When I bought the Peugeot a year ago at a collectors' trade fair in Utrecht/Holland, its original state, after 120 years or so of use, could only be described as badly damaged.
The machine head was very rusty and almost all of the decoration was worn away. Rust was present, even underneath the japanning you all know what that means.
The woodwork was also in a bad way. The table top had at least six different places with missing walnut veneer and one could see through to the massive wood layer underneath. Veneer was loose in many places and the wood had a serious crack in it.

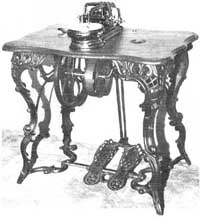
This picture shows the state of the Peugeot before work on the woodwork had started; the machine head had already been restored
The cast-iron treadle was rusty, though still moved without any force. The leather belt was, of course, missing.
But still, I saw the Peugeot, I knew the ownera good collector friend of mineand fell in love with it. To be honest, I had never before seen such a Peugeot Balancieres, and the price was fair.
I know that many collectors choose only items which are in almost-perfect condition, decor completely intact, etc. But, for me, it is the individual history of each antique sewing machine that counts. And restoring as far as possible, for me, the real challenge.
The machines have worked for more than 100 years, produced many clothes for men, women and children, then get thrown away or dumped just because they are old and battered, making way for more-modern, electric, models.
What a shame; these machines are worth preserving

This picture shows the table in its damaged condition; notice the missing veneer
What are the basic ideas of restoration?
Restoration means putting furniture or any other antique item back into its original state; that is, the same state as it was when new.
But that's easier said than done.
Think of an old Egyptian artefact, like a sarcophagus. It can be 2000 to 5000 years old, but badly damaged. Putting it back to its 'new' state would destroy its 'archaeological' value completely. The same goes, for instance, a partly-missing and/or completely-missing decoration on a machine head. Repainting would totally destroy its 'collector' value. Therefore, never do it.
Restoration also means conservation. Conserve the antique piece; protect it from further destructive modern influences. It can then last for another couple of centuries, carries a lot of history and is, therefore, interesting for future generations of collectors.
Restoration, however, does need some expertise. You have to know what you are doing in order to conserve/restore but, most importantly, not destroy.
My Peugeot is 'conserved' for at least another century. To learn how you too can do it, read on......
Restoring the head
Although mechanically complete, the japanning had suffered the most. Also most of the decoration had worn off and/or disappeared with the rust.

The machine head was in a hopeless condition just look at the picture above
The biggest problem was to remove rust but not destroy more of the japanning and decoration. All other unpainted metal parts were very rusty as well. The machine must have been stored in a very wet environment with a high degree of humidity, possibly in a barn or in a loft.
Removing the rust and polishing the bright metal parts was little more than a standard exercise. The tool I used, and highly recommend, was a Dremel, a small American-brand electric drilling/grinding/polishing machine, like a drilling machine. It uses tiny rotating tools that lets you remove rust and/or polish even in the smallest places or corners.
Most of the work was done with the Dremel, and it took some hours to remove the rust gently and completely.
After that I polished the bright metal parts with steel wool to make the surfaces very smooth and shiny. The
mechanical parts underneath the ground plate I cleaned to get rid of dirt, dust and a few rust spots and I
oiled and greased everything until the machine turned again as it had when it was new.
The rest of the job was more complex. How, for example, do you remove rust lying underneath the japanning? The answer is, it is just not possible. I left it alone and I simply glued back the loose places of Japanning to the bed plate.
But to protect the machine head from further future damage-rust, scratches, etc, I had to seal it with a varnish. Remember, regardless of the state of an antique item, one has to conserve it from further damage.
Don't call me a radical because I did this, but take a look at the machine head it has had a tough time. And though the operation looks very dramatic-looking, this wouldn't have been necessary, of course, had the black Japanning been intact. But it was essential if I were to prevent eventual complete destruction of the machine, which would have occurred had I allowed the rusting to continue unprotected.
Therefore, in this case, there was only one solution to the problem. I sprayed the head with varnish to
completely seal it for its future protection. It is conserved and restored now and for the future, so
hopefully it will last another 100 years and more.
Restoring the woodwork
Restoring woodwork is often very complex and needs many hours devoted to the task. Besides that, you need experience in how to do it; also certain tools and machines aimed at making the job easier and quicker.
But first of all, what makes things so complicated? The answer is the way they originally made the item, the natural materials they used and Mother Nature.
Veneer
Many woods: mahogany, walnut, cherry, palisander, oak, etc, were very expensive and still are. Techniques were developed 400 years ago to cut very thin layers of those costly timbers. It is called veneer, which is a thin layer glued on both sides of a massive piece of wood of a less-expensive type. Veneer has been cut by saws to layers of 1.5mm or thicker in the Middle Ages, but in the 19th century they cut down to a thickness of 0.5mm.
Glue: Made of animal skin and bones
These veneers were fastened to the massive layers using glue made of animal skin and bones. These raw materials were cooked for days with other materials until they got a very sticky and slow-flowing mass-natural glue. This glue had first to be heated up to approximately 100 degrees Celsius. Then it was applied with a brush, still in its hot state, onto the wood, the veneer laid on and then, glue still hot, pressed until the glue cooled.
This method of gluing was very effective, the glue got very hard, was a Mother Nature product, and cheap. Disadvantage was that it had no resistance against environmental influences such as fungus, insects, moisture and, worst of all, heat. These influences often loosened the veneers.
Insects
Insects form a big threat to all antique furniture and woodwork. Wood is a natural product and, in those days, not protected against insects by aggressive chemicals. Tropical insects such as termites destroy wood simply by eating it up completely until it is hollow, friends in Australia, South America and Africa take care and can't be restored any more.
Small beetles are the most common European and North American insects that are attracted to our antiques. Once you see them you have no idea that they could harm any woodwork...but they do.
You can't fight them, but you can protect the wood. With chemicals, for instance which for health reasons I do not recommend or by putting the antique woodwork into rooms which are heated and/or climate controlled and are secured from flying and creeping insects.
These beetles fly from March to July in the Northern Hemisphere and lay their eggs on (mostly) dead wood, such as your antiques are made from. The eggs are laid in small gaps, corners, scratches, etc, of antique woodwork. After a few hours or days small woodworms exit the eggs, eat themselves into and through the wood, until they are grown enough to become adult beetles, a process that can take up to 15 years.
Imagine what damage even one small woodworm can do to your antiques. The small holes you see on the surface of a table or cabinet are made when the woodworm transforms into a young beetle and breaks out to fly awayto meet another beetle, mate, and produce more eggs. And then the process starts all over again and again-it's nature.
So these are the factors which could make restoration difficult or sometimes impossible.
Let's take a look at the Peugeot 's extensive damage.
Damage report
The woodwork, as you may know, is very simple with a Peugeot. Only the sewing table is made of wood, in the Baroque style. Although Baroque was fashionable around 1700 to 1750, in 1880 they just copied it again.
It has on both sides veneer layers of French walnut. On the top surface it is of much better quality than underneath the table. The profile ledge around the table was black to contrast with the dark brown walnut.
Veneer was lost on at least eight places and was loose and, therefore, wavy on a lot of other spots. This 'wavy' appearance is caused because heat and/or moisture dissolved the glue underneath the veneer. Finally, the varnish, as you can see in the first picture, is almost gone, exposing the costly walnut veneer to the air and other rough influences. On two other spots cigarettes burned the veneer. There was also a severe crack in the table plate.
The steps of this restoration can be described as follows:
1. Cleaning the wooden surfaces
2. Repairing the woodwork
3. Filling wormholes, scratches, cracks, etc, with coloured filler
4. Sanding and smoothing the surfaces
5. Staining the wood
6. Spraying the woodwork with varnish
1. Cleaning the wooden surfaces

All ready for a cleaning job
Dirt, grease, oil and remaining old varnish have to be removed. This is very important and has to be done thoroughly. But rigorous methods can further destroy the woodwork so we have to be careful. I used half a litre of ammonia to two litres of warm water. Mix it and wash the surface with it thoroughly. Use a sponge and a brush, but be careful not to make any damage worse. Watch out for the veneer if it is already loose. Also be careful that all the wood doesn't get too wet. Use rubber household gloves to protect your skin since ammonia is caustic.
As you wash off the varnish and dirt of a century you will notice that the walnut gets darker and darker. This is a good effect, because it tells you that dirt and varnish have been washed away.
Take another basin of warm water and put in it a little kitchen cleaner-a mixture of soap and chlorine. Wash again and dry with a towel. Let it dry then in a slightly heated room. Leaving it in the heat of, for instance, the sun can dry it too rapidly and cause severe damage.
2. Repairing the woodwork

This picture shows an edge with the veneer sample I used to repair the veneer on the table
There was a crack in the veneer and the wooden table top which needed to be glued, very simple using modern carpenter's wood glue which dries quickly. Use a small brush and make sure that the whole crack is filled with glue. Then use clamps to press it together for two to four hours or until the glue is completely dried.
Repairing the veneer is somewhat more complicated. First of all, you have to find veneer to fill in holes and
other damaged pieces see the pictures. Never use new veneer as it won't suit the original style or grain of
wood, and will have a different colour. You may be able to loosen some veneer from underneath the table top if
it has the same finish.
That would be the best solution, because often manufacturers used the same veneer on both sides of a table. With my Peugeot, the veneer on the underside was French walnut too, but a different, cheaper, type, so I had to find another solution.
It came via another European sewing-machine case, which is still to be restored. By co-incidence a loose piece of walnut veneer on the under side matched the top of the Peugeot. I can replace it later with another walnut veneer and, since it isn't visible, a perfect match does not matter as much.

Veneer repair; look at the 'wedge' shape of the filled-in piece of erone of a total of eight
After you have found some old veneer in the same style you have to make, as in a jigsaw puzzle, pieces of veneer to fill the empty spots. Use a very sharp knife and a ruler to cut the pieces. Then take a pencil and cut out the respective spots on the table where the re-fill veneer has to be put in. It is very important that the re-fill veneer fits in very precisely so that one can hardly see the repair. The following picture shows a detail of the table with a repaired spot. Be careful that the re-fill veneer piece has been cut in form of a wedge so as to fit very precisely.
When every piece fits precisely, glue it with common carpenter's wood glue using a wooden slab and clamps. A modern piece of wood which is covered with any plastic surface will not stick to the table and can be removed without problems after the veneer has been glued.
Another problem is what do we do with the veneer waves? These waves appear because the veneer does not stick to its base anymore and is loose in quite a few places.
The answer is rather simple; use an old iron heated up to 100 degrees Celsius. Warm up small spots until they
get close to 100 degree and clamp with a massive piece of wood for five minutes. Because the original
manufacturers fixed the veneer with skin and bone glue some 120 years ago this glue can be heated up again,
pressed and it will stick again. Loosening the whole veneer and gluing it with modern glue is not possible
most of the time. Attempts to remove the old veneer will often damage it much further, so don't try it.
3. Filling wormholes, scratches, cracks etc. with coloured filler

This picture shows the under side with all the wormholes filled with wood cement (also called artificial wood)
This operation is quite easy. Use common modern wood cement to repair all holes or scratches on the surface.
This is important for two reasons: Firstly, to fill holes for a perfect and smooth surface before varnishing and secondly, wormholes, unless filled, will eject any wood dust continuously for years.
Wood cement can be based on water or on a solvent. If you use a solvent-based version, open the window to allow sufficient ventilation while applying it.
Very important is the colour match. It must be the colour of the table after it is stained and varnished.
Use a knife to smoothly rub the filler into gaps, holes and cracks. Do not put too much on a hole because you will have to sand away any access afterwards. But also don't use too little because, while drying, it will shrink a bit. After an hour or so at 20 degrees Celsius you can sand away the rest of the cement until only the filled holes/scratches are visible in the veneer.
4. Sanding and smoothing the surfaces
The next operation is a very dusty one. It is sanding and smoothing the wood. I recommend sanding and smoothing by hand rather than by using an electrical sander, You have to be especially careful when sanding veneer. Remember that the veneer is often less than 0.5mm thick. Too rough treatment can destroy a complete surface. Do it by hand using a piece of cork. Do it carefully, first sanding away the excess wood filler. Use sandpaper with a 120 grit. This is fine but rough enough to sand away the veneer. Sandpaper with a 80 grit is too rough for veneer.

Doing it by hand rather thanwith a sanding machine
For sanding the profiled ledge you will have to use your hands and fingers. Only they can do the job because they fit into the profile very easily. To protect your lungs from wood dust, a mask covering mouth and nose is recommended.
Sanding will also remove any remnants of old varnish and stain. The idea is NOT to sand away until it looks like new. If you sand old wood too much, as for example with a machine, then all the age and patina, the marks, scratches and gaps caused through natural usage of the sewing machine that makes it an antique, disappear and you will get the impression that the table is new. That is not the idea at all. It must look old; it must look original.
Finally, after all wood cement remnants and glue are sanded away, we smooth the wood using 180 grit sandpaper. That is a very fine paper and makes the wood very smooth.
To give it that final finish, take a sponge and water and make the surface damp again, but not too wet. This will raise the grain a little allowing a further chance to use the 180-grit sandpaper when the wood is dry.
5. Staining the wood
Staining the wood gives back, after washing away old stain and varnish, the original colour. The stain I use is a German product called 'Clou, Beize wasserlöslich'. It is a powder to be dissolved in water. You can get different colours.

Profile edge brushed with black stain
I used walnut for the table top and black for the edge.
Before we begin staining the wood we have to remove grease, wax and oil residue from the surface. I use a sponge with industrial alcohol, unfortunately not drinkable, rub the surface with it then let dry. Most of the greasy/waxy residue will be transferred to the sponge. If you don't do this, the stain may miss the greasy spots and later the varnish will not dry.
First I stained the profile edge. I used a small brush but even then you can't avoid a little black stain
getting on the walnut veneer where it does not belong. No problem, just sand it away with 180 paper when it is
dry.
Use a clean sponge to put the walnut stain onto the surface of the table-underneath first, then the top. First make it wet, then rub in. Let it sink into the veneer for a while, about 15 seconds, then remove any surplus with the squeezed, almost-dry, sponge. Avoid rubbing with the walnut stain sponge on the black profile edge as it would remove or dissolve the black stain.
6. Spraying the woodwork with varnish
I use a spray gun driven by a small air compressor to get better, smoother, results. You could also use a fine hand brush.
I used a modern polyurethane varnish. It gets very hard, cannot be scratched and has a silk shiny finish. You could also use old-style shellac varnish as used 120 years ago in the Peugeot factory and in most other woodworking shops as well. The result can also be great, but it won't be as tough as a modern varnish. And to conserve an antique piece for later centuries, I can only recommend modern varnishes.
I would never use wax for the finish. Wax is very soft. It can't protect surfaces against scratches or liquids (such as water, alcohol, water from a flower vase, etc). Liquids can create nasty spots or rings on wood and even flow into the veneer, where only with much effort can they be restored again.

Spraying the surface with an air gun is very easy. Just avoid spraying too much at one as the varnish can flow over the edges and create teardrops. The underside is sprayed twice, the top four times. After every spray operation the surface has to dry at least four hours at 20 degrees Celsius. After the varnish is dry and hard, it is carefully smoothed with 280-grit sandpaper. Be careful; avoid sanding through all the varnish layers until you meet the veneer. It would remove the stain and create a nasty colour.
Sanding the varnish creates a very fine and smooth surface and is, therefore, important for the final result. After the third sprayed varnish layer it is sanded by hand again do not use a cork block at all and then also carefully rub with fine steel wool. This gives a soft shining surface. If you look over the surface it is really polished and shines like metal.
After that, spray it for the last time. After drying it is ready for mounting the machine head and the spool winder.
Hint: If you have to spray outside in the open air -- don't do it inside if you have no mechanical ventilation -- don't do it if it is windy. Dust blown onto the wet varnish does not give a good result.
Restoring the cast-iron treadle

My treadle didn't need much treatment. As the whole style of the Peugeot Balancieres is rustic not as fine as, for example, a Florence it was roughly painted black in the Peugeot factory.

I just removed all dust, rust and loose paint with a rotating steel brush, taking care not to sand away any original paint.
After cleaning I also washed away grease, oil and dirt with an old towel dampened with petrol. I then sprayed it with the same polyurethane varnish as the woodwork. The reason for this is simple. Cast iron and original paint are protected against water and it has the same optical finish as the woodwork.
And, finally, the result of the restoration

|

|
| Sanne, 7, and Anouk, 9, our two daughters, present the restored Peugeot.Both are fond of toy sewing machines and are probable collectors of the future. | |
Summary
The Peugeot 2 Balancieres is a rustic piece. It was built rather sturdily and of massive proportions for longevity. France is a big country; transport and service were problems 100 years ago. To get sewing machines, clocks, etc, mended they depended on the village blacksmith. He could handle rougher mechanics, but not fine ones, such as a watch. This philosophy resulted in the design of the Peugeot.
In total I invested about 40 hours of work and about £35/$50 for sandpaper, rotating tools, varnish, etc, and enjoyed every minute of the work.
Tools you could use for restoring old sewing machines

This Bremer & Bruckmann machine will be my next restoration candidate. It is in good mechanical order but it's rusty and in rough condition. It will be another challenge
Besides the common rotary brushes the round ones made of hard plastic brushes diameter 5mm up to 5cm, steel, brass and horse hair I also use a number of bigger rotating steel brushes, like the one illustrated. It speeds up cleaning work, but one has to be careful. They are so rough that they can damage metal and painted surfaces.
The absolutely must-have tool is, in my opinion, the Dremel. It is light and lays perfectly in the hand in
use. It can be enhanced with many other tools such as a flexible shaft, milling devices, etc. An American
brand, they sell at local tool shops worldwide and I can really recommend it.
Graham Forsdyke comments:
Not all restorers will agree totally with the views expressed by Oliver in the above article in particular many might question the use of modern varnishes on previously- waxed or French polished surfaces.
However, the article is presented as one man's view and, as with all such stories published in ISMACS News, does not represent any Society policy or recommendation.